Flask deployment of Gaussian Mixture Model
Overview:
In this post I go over deploying a machine learning model on a Flask development server using Flask and Docker. The machine learning model is the Gaussian Mixture Model discussed in this post. All the relevant code for the flask deployment can be found in my repo here.
Endpoints:
The /predict endpoint:
The /predict endpoint gives a form to be filled:
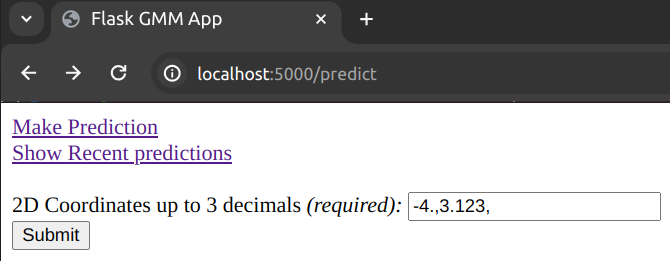
The form is validated on the client side by requiring a regex match.
<input type="text" name="coords" id="coords" value="-4.,3.123," required pattern="^(-?[0-9]\.([0-9]){0,3},){2}$"/>
It requires two comma-separated floats (and a trailing comma) up to 3 decimal places precision. This is because in the demo, the GMM works with 2d inputs.
Once the submit button is clicked, or alternatively curl is executed with appropriate flags:
curl -X POST -F coords=-4.,3.123, localhost:5000/predict
a json is returned of the type:
{
  "2024-01-08-08-55-54": "0"
}
denoting when the form data was read and "0" stands for the index of the group in which the inputs were classified by the model. So the json is {"date": "predicted_class"}.
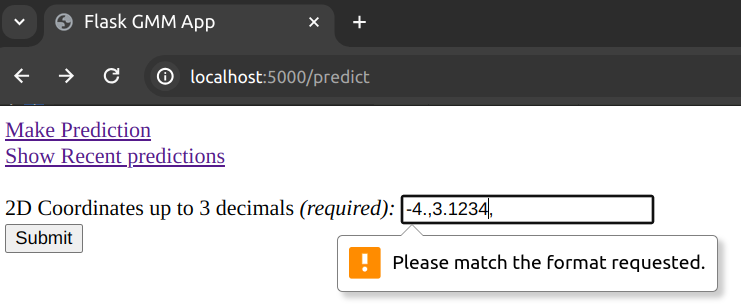
Example of bad input:
Unless the input complies with the regex given above, we get a client side validation error. Here is an example of a client side validation error because a 4-decimal float was entered when we only support up to 3 decimal places.:
The /show_predictions endpoint:
The /show_predictions endpoint gives a table recent predictions together with their inputs in reverse chronological order.
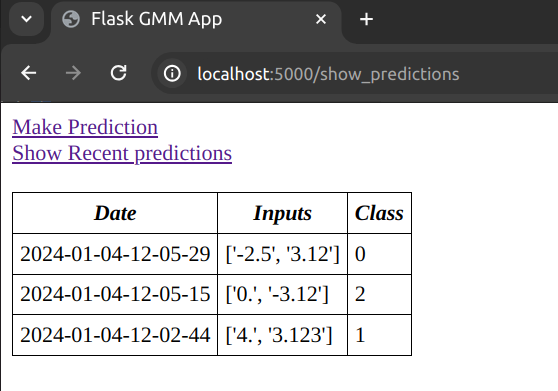
As we make POST requests, these are stored in a data structure in-memory together with their predictions from the model. The datastructure has a max_len data attribute giving the maximum capacity of the data store. When that capacity is reached and a new POST request is made, the oldest record is evicted from the data store. The logic for this data structure is shown in the code snippet below:
from collections.abc import Iterable


class RecencyStore(Iterable):
    def __init__(self, max_len=10):
        self.max_len = max_len
        self.i = 0
        self.store = []

    def add_item(self, item):
        if len(self.store) < self.max_len:
            self.store.append(item)
        else:
            self.store[self.i] = item
        self.i = (self.i + 1) % self.max_len

    def __iter__(self):
        if len(self.store) == 0:
            yield None
        else:
            i = self.i - 1
            for j in range(len(self.store)):
                pos = (i - j) % len(self.store)
                yield self.store[pos]

    def __len__(self):
        return len(self.store)
If no POST requests have been made yet, an empty table will be displayed.
The links to the /predict and /show_predictions endpoints are given as a navigation list on each page.
Running the server:
As mentioned earlier, I use a Docker container to run the flask sever and expose its relevant port to be accessible from my machine. I also use a multistage build to lower the size of the image, taking only the relevant files from the first stage. The relevant Dockerfile is given below.
FROM python:3.10.13-slim as builder

WORKDIR /model

COPY requirements-gmm-flask.txt .

RUN pip wheel --no-cache-dir --no-deps --wheel-dir /model/wheels -r requirements-gmm-flask.txt

FROM python:3.10.13-slim

WORKDIR /model

COPY --from=builder /model/wheels /wheels
COPY --from=builder /model/requirements-gmm-flask.txt .

RUN pip install --no-cache /wheels/*

WORKDIR /model/probabilistic_models

CMD ["python3", "-m", "pytest"]
As you can see, the default command is to execute all tests in the probabilistic_models repo with pytest. This is not necessary for this project in particular, so we shall overwrite the CMD in runtime.
Navigate to the probabilistic_models directory and build the docker image from the Dockerfile using:
DOCKER_BUILDKIT=1 docker build -t mixture-models-flask -f Dockerfile-gmm .
and then again from that directory run the container in interactive mode overriding the CMD with bash like so:
docker run -v $PWD:/model/probabilistic_models -it -p 5000:5000 --name flask-cont mixture-models-flask bash
This will start a terminal emulator inside the container. Then to save a trained GMM model you should run the fit-predict test like so:
python3 -m pytest tests/test_gmm_server.py::test_fit_predict
from inside the container terminal session.
The code above will generate a gmm.joblib file in the flask_gmm directory with the serialised trained model.
Finally, to start the flask development server you should run the command:
flask --app flask_gmm/app.py --debug run --host 0.0.0.0
again from inside the container.
Now you should be able to see the /predict webpage if you type localhost:5000/predict in your web browser.
Note: For full details about the model serialisation and the flask application file see the repository.